Saturday, 28 April 2018

Load data to Kafka from pentaho


Set Up Kafka and use from pentaho


In this tutorial, I will show how to set up and run Apache Kafka on Windows/linux and how to load/read data from pentaho. 
Kafka comes with two sets of scripts to run Kafka. In the bin folder, the sh files are used to set up Kafka in a Linux environment. In the bin\windows folder, there are also some bat files corresponds to those sh files which are supposed to work in a Windows environment.  Some say you can use Cygwin to execute the sh scripts in order to run Kafka. However, they are many additional steps involved, and in the end you may not get the desired outcome. With the correct bat files, there is no need to use Cygwin, and only Server JRE is required to run Kafka on Windows.

Step 0: Preparation

Install Java 8 SE Server JRE/JDK

You need Java SE Server JRE in order to run Kafka. If you have JDK installed, you already have Server JRE installed, just check if the folder {JRE_PATH}\bin\server exists. If it is not, follow the following steps to install Java SE Server JRE:
  1. Unpack it to a folder, for example C:\Java.
  2. Update the system environment variable PATH to include C:\Java\jre\bin, follow this guide provided by Java.

Download Kafka

  1. Download the binaries from http://kafka.apache.org/downloads.html
  2. Unpack it to a folder, for example C:\kafka

Step 1: Update files and configurations

Update Kafka configuration files

The config files need to be updated corresponding to Windows path naming convention.
Change this path if you using Windows
*** Important :- create this path inside Kafka root directory,other wise Kafka server may not start
  1. Open config\server.properties, change


server.properties
1
log.dirs=/tmp/kafka-logs

to


server.properties
1
log.dirs=c:/kafka/kafka-logs

2.. Open config\zookeeper.properties, change


zookeeper.proerties
1
dataDir=/tmp/zookeeper

to


zookeeper.properties
1
dataDir=c:/kafka/zookeeper-data

Step 2: Start the Server

In Windows Command Prompt, switch the current working directory to C:\kafka:


1
cd C:\kafka

  1. Start Zookeeper
  2. you can create bat file to start Zooker (optional)  kafka-server-start.bat and put below conteent      kafka-server-start.bat {base folder}\kafkaBinary\kafka_2.11-1.1.0\config\server.properties
Kafka uses ZooKeeper so you need to first start a ZooKeeper server if you don’t already have one. You can use the convenience script packaged with Kafka to get a quick-and-dirty single-node ZooKeeper instance.


  1. you can create bat file to start Kafka (optional)    kafka-server-start.bat and put below conteent      zookeeper-server-start.bat {base folder}\kafka_2.11-1.1.0\config\zookeeper.properties


1
> .\bin\windows\kafka-server-start.bat .\config\server.properties

Step 3: Create a topic

  1. Create a topic
Let’s create a topic named “test” with a single partition and only one replica:


1
> .\bin\windows\kafka-topics.bat --create --zookeeper localhost:2181 --replication-factor 1 --partitions 1 --topic test

2.. List topics
We can now see that topic if we run the list topic command:


1
> .\bin\windows\kafka-topics.bat --list --zookeeper localhost:2181

Step 4: Send some messages

Kafka comes with a command line client that will take input from a file or from standard input and send it out as messages to the Kafka cluster. By default each line will be sent as a separate message.
  1. Start console producer


1
> .\bin\windows\kafka-console-producer.bat --broker-list localhost:9092 --topic test

2.. Write some messages


1
2
This is a message
This is another message

Step 5: Start a consumer


1
> .\bin\windows\kafka-console-consumer.bat --zookeeper localhost:2181 --topic test --from-beginning

If you have each of the above commands running in a different terminal then you should now be able to type messages into the producer terminal and see them appear in the consumer terminal.
Yay cheers!

Common Errors and Solutions

classpath is empty. please build the project first e.g. by running 'gradlew jarall'

  • Note: Do not download a source files from appache kafka, download a binary file

Kafka java.io.EOFException - NetworkReceive.readFromReadableChannel

Zookeeper may not configured propery (may be configured with different port number)

References
https://kafka.apache.org/

Kafka tool installation:

This is GUI interface of kafka where you can view messages,check count of messages and create and delete Kafka topic
Down load kafka tool from 
http://www.kafkatool.com/
Now install executable file in your system
This is very useful tool to view data in kafka


Load data to Kafka Topic using pentaho 8.0:

step 0:-if you are not using pentaho 8 you may require to download kafka producer and consumer from pentaho wiki
https://wiki.pentaho.com/display/EAI/Apache+Kafka+Producer
https://wiki.pentaho.com/display/EAI/Apache+Kafka+Consumer

1.start spoon.bat
2.open spoon canvas
3.Read  data from file/database or data grid
4.convert data to valid Json object 
5.Load data to kafka topic (may be conversion to valid json object is required)

Download below example from here
https://drive.google.com/file/d/1Ik0RGTSTKphPrGN4M7rwDLhFDpsDbAsd/view?usp=sharing


while using  pentaho consumer you can use same configration as shown in above example

Important:-you need to change GROUP ID every time if you want to read data from start. 


Some useful Json quary Tips. 


Exapmle


---------------
{ "store": {
    "book": [ 
      { "category": "reference",
        "author": "Nigel Rees",
        "title": "Sayings of the Century",
        "price": 8.95
      },
      { "category": "fiction",
        "author": "Evelyn Waugh",
        "title": "Sword of Honour",
        "price": 12.99
      },
      { "category": "fiction",
        "author": "Herman Melville",
        "title": "Moby Dick",
        "isbn": "0-553-21311-3",
        "price": 8.99
      },
      { "category": "fiction",
        "author": "J. R. R. Tolkien",
        "title": "The Lord of the Rings",
        "isbn": "0-395-19395-8",
        "price": 22.99
      }
    ],
    "bicycle": {
      "color": "red",
      "price": 19.95
    }
  }
}

Json Query Result 


XPathJSONPathResult
/store/book/author$.store.book[*].authorthe authors of all books in the store
//author$..authorall authors
/store/*$.store.*all things in store, which are some books and a red bicycle.
/store//price$.store..pricethe price of everything in the store.
//book[3]$..book[2]the third book
//book[last()]$..book[(@.length-1)]
$..book[-1:]
the last book in order.
//book[position()<3]$..book[0,1]
$..book[:2]
the first two books
//book[isbn]$..book[?(@.isbn)]filter all books with isbn number
//book[price<10]$..book[?(@.price<10)]filter all books cheapier than 10
//*$..*all Elements in XML document. All members of JSON structure.

References 
http://www.jsonquerytool.com/
http://goessner.net/articles/JsonPath/

Saturday, 25 March 2017

How to process PDF file in PDI pentaho Kettle

Process PDF files in Pentaho kettle.
--------------------------------------------
Prerequisite :- 
 Pdf file reader java/jar file required 
Please Download this from below location

https://drive.google.com/file/d/0B_j1hJxesvxdSVhVUXloVkJybUE/view?usp=sharing

How to read pdf files through Pentaho PDI Kettle.

1.Use Get PDF File Names step to take name of pdf files.
2. you use wild card if if you want to process multiple files (.*.pdf).
3.now use copy rows to result to put pdf filename and their location to stream
   so that this can be used as parameter in next transformation.
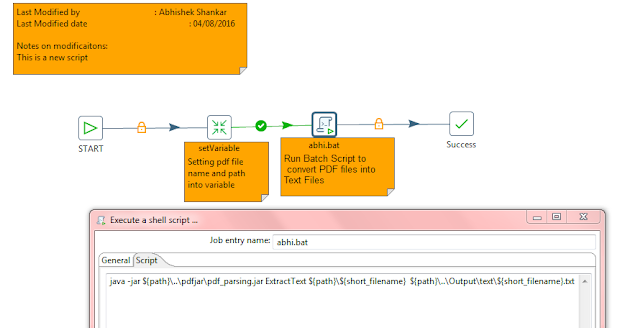
4. Create variable and assign value of  pdf filename and their location on them.(refer image below)

5.Now use shell script step to execute below command
java -jar ${path}\..\pdfjar\pdf_parsing.jar ExtractText ${path}\${short_filename}  ${path}\..\Output\text\${short_filename}.txt
you can use hard coded path as well
example:
java -jar D:\1_pdfparsing\pdfjar\pdf_parsing.jar ExtractText D:\1_pdfparsing\pdfFiles\abhi.pdf D:\1_pdfparsing\pdfFiles.txt

6.In PDI use shell script step to execute above command.

Download working copy of above example from download PDI PDF process

https://drive.google.com/file/d/0B_j1hJxesvxdSVhVUXloVkJybUE/view?usp=sharing


4. Create variable and assign value of  pdf filename and their location on them.


5.Now use shell script step to execute below command
java -jar ${path}\..\pdfjar\pdf_parsing.jar ExtractText ${path}\${short_filename}  ${path}\..\Output\text\${short_filename}.txt
you can use hard coded path as well
example:
java -jar D:\1_pdfparsing\pdfjar\pdf_parsing.jar ExtractText D:\1_pdfparsing\pdfFiles\abhi.pdf D:\1_pdfparsing\pdfFiles.txt


In PDI use shell script step to execute above command


Include all step in one Job


Download working copy of above example from download PDI PDF process

https://drive.google.com/file/d/0B_j1hJxesvxdSVhVUXloVkJybUE/view?usp=sharing


Monday, 15 August 2016

Export data to PDF through PDI

Export  any data which is in PDI to PDF.

Please follow below step to execute
 Download related files from below location
https://drive.google.com/file/d/0B_j1hJxesvxdM3BMZXBLNWxoczg/view?usp=sharing
1.Extract Zip file
2.Open "Abhishek_pdf_as_output_test.ktr" in pdi
3.Run this transformation
4. see output as PDF  in "output" folder with name “abhi.pdf”.
5.if you want to Modify/Add/Remove data open  "source.ktr" go to “Data grid “ step and under Data Tab  modify  data ,then save it.
after that Run "Abhishek_pdf_as_output_test.ktr" in pdi.

6.see output as PDF  in "output" folder with name “abhi.pdf”.

Note:- Pentaho report (.prpt) file need to create based on output which you want in PDF.

Download related files from below location
https://drive.google.com/file/d/0B_j1hJxesvxdM3BMZXBLNWxoczg/view?usp=sharing

Tuesday, 12 May 2015

Change Date Capture (CDC) in Pentaho Kettle

CDC
-----
In databaseschange data capture (CDC) is a set of software design patterns used to determine (and track) the data that has changed so that action can be taken using the changed data. Also, Change data capture (CDC) is an approach to data integration that is based on the identification, capture and delivery of the changes made to enterprise data sources.
CDC solutions occur most often in data-warehouse environments since capturing and preserving the state of data across time is one of the core functions of a data warehouse, but CDC can be utilized in any database or data repository system.
---wikipedia


If you are not familiar with CDC, here a brief summary: CDC allows you to capture all the data from the source system that has changed since the last time you ran the ETL process. Wikipedia gives a more detailed overview in case you are interested. In the easiest case you have some sort of timestamp or datetime column that you can use for this purpose. The following example will be based on a simple sales table that has a date column which we can use for CDC:


Note that this is dataset has actually quite old data, something that we have to keep in mind. What happens if new data gets inserted later on? More on this after the basics.


Open your favourite SQL Client (and start your MySQL server if it is not running yet) and issue following SQL statements:


USE
test
;


DROP TABLE IF EXISTS
`sales`
;


CREATE TABLE
`sales`
(
`date` DATETIME,
`product_type` VARCHAR(45),
`sales` INT(255)
)
;


INSERT INTO
`sales`
VALUES
('2010-01-20 00:00:00','Shoes',234),
('2010-01-20 00:00:00','Cheese',456),
('2010-01-21 00:00:00','Shoes',256),
('2010-01-21 00:00:00','Cheese',156),
('2010-01-22 00:00:00','Shoes',535),
('2010-01-23 00:00:00','Cheese',433)
;


SELECT
*
FROM
`sales`
;


Now the way to get the timeframes for querying the data is to use the Get System Info step:

  1. Open Kettle and create a new transformation
  2. Drag and drop a Get System Info step on the canvas. You can find it in the Input folder.
  3. Double click on it and populate the names column in the grid with start_date and end_date.
  4. For the type choose start date range (Transformation) and end date range (Transformation) respectively


Click on Preview rows and you will see that Kettle displays a rather old datetime for the startdate (1899/12/31 23:00:00) and the current datetime for the enddate. Now this makes perfectly sense as with first run of your transfromation you want to get all the raw data from your source system. In case you don’t want this, I’ll show you a trick later on on how to change this.
Now this is an easy approach for CDC. You can feed the start and end date from the Get System Info step to a Table Input step in example and use the start and end date in the WHERE clause of your SQL query:


SELECT 
date 
, product_type 
, sales 
FROM sales 
WHERE 
date>=? AND 
date<? 
;

The question marks will be replaced on execution by the start and end date (but make sure they are defined in this order in the Get System Info step).

Let's add some more steps to our transformation:

Make sure that you enable Replace variables in script? and choose the Get System Info step for Insert data from step. The hop between the Get System Info step and the Table Input step now also displays an info icon. 

Setting up Logging
Kettle provides various levels of logging, the transformation logging being the one with the highest level. We will only look at the transformation logging here. 


  1. Press CTRL+T and the Transformation properties dialog will be displayed. 
  2. Click on the Logging tab and then highlight Transformation on the left hand side. 
  3. Our log will be placed in a database table, hence provide the info for the data connection and table name.
  4. We only want to keep the log records for the last 30 days, hence we set Log record timeout (in days) to 30.
  5. It’s best to keep all the logging fields (less maintenance)
  6. Provide step names for some of the fields, in example:

  • LINES_INPUT: specify the input step that represents the amount of imported data best. 
  • LINES_OUTPUT: specify the output step that represents the amount of imported data best

  1. Press the SQL button and Kettle will automatically generate the DDL (the create table statement) for you. Just press Execute and your logging table will be created on your specified database. Nice and easy!


So now we are all set and can run our transformation and see what’s happening. Click the Play button to execute the transformation. If your transformation executed successfully, close the transformation and open it again, then on the bottom click on the Execution History tab and you will so the logging information. (Kettle automatically reads the data from the table we just created).


Now pay attention to the Date Range Start and Date Range End field: It includes the data from our Get System Info step. Now execute the transformation again and see what happens (Click the Refresh button):


  • You can clearly see that Kettle new choose the CDC end datetime (which is the start datetime) of the last transformation execution for the start date. The last transformation execution has the Batch ID 0 in the screenshot above.
  • The CDC end date is set to the start date of the current transformation execution.

A safe approach to CDC

The CDC approach mentioned above is actually quite dangerous if your source data table doesn't get filled consistently. A safer approach is to use the maximum date of your source data as the CDC end date. Kettle provides this functionality out of the box: In the Transformation properties you can find a Dates tab. Click on it and provide following details of your fact table:


  1. Maxdate Connection: the database connection
  2. Maxdate table: the table name of your source table
  3. Maxdate field: the datetime field in your source table that you use for CDC
  4. Maxdate offset (seconds): If there are some inconsistencies in your source data, you can set a negative offset here. In example: -120 means that 120 seconds will be deducted from the max end date for CDC


As you can see from the screenshot above, I referenced again our main input table. So whatever the maximum date in this table is, Kettle will now use it for CDC. Open MySQL Client and delete all the records from our transformation log table, then start the transformation. As you can see from the Execution History Kettle now use the maximum date of our data set.


What more to say? Well, if you are unhappy with the first timeframe that Kettle chooses, just run the transformation once without any raw data input step, open a SQL client and update the end date with a date of your liking (this end date should be the start date that you want for the next execution). The next time you run your transformation, this datetime will be used for the start of your timeframe. 

References

http://diethardsteiner.blogspot.in/