Pentaho BA Server Performance Tips
The Pentaho BA Server ships in a condition designed to work well for the majority of customers. However, deployments
that drift toward opposite extremes -- very large and very small -- will need to adjust certain settings, and possibly even
remove certain unused functionality, in order to achieve the desired performance goals without adding hardware.
Read through the subsections below and decide which ones apply to your scenario.
Move Pentaho Managed Data Sources to JNDI
Most production BI environments have finely-tuned data sources for reporting and analysis. If you haven't done any
data warehouse performance-tuning, you may want to consult
Pentaho Analysis (Mondrian) Performance Tips
on page
20
for basic advice before proceeding.
Pentaho provides a Data Source Wizard in the Pentaho User Console and a data source dialogue in the Pentaho
Enterprise Console that enable business users to develop rapid prototype data sources for ad hoc reporting and
analysis. This is a great way to get off the ground quickly, but they are "quick and dirty" and not performant. For
maximum performance, you should establish your own JNDI data connections at the Web application server level, and
tune them for your database.
JNDI data sources can be configured for Pentaho client tools by adding connection details to the
~/.pentaho/
simple-jndi/default.properties
file on Linux, or the
%userprofile%\.pentaho\simple-jndi
\default.properties
file on Windows. Design Studio requires that connection details be added to
/pentaho-
solutions/system/simple-jndi/jdbc.properties
as well.
Manual Cleanup of the /tmp Directory
Every time you generate content on the BA Server, temporary files are created on the local file system in the
/
pentaho-solutions/system/tmp/
directory. In some cases, the BA Server may not properly purge that temporary
content, leaving behind orphaned artifacts that can slowly build up and reduce performance on the volume that contains
the pentaho-solutions directory. One way to address this is to mount the /tmp directory on a separate volume, thereby
siphoning off all disk thrash associated with creating new content. However, you will still have to perform a manual
garbage collection procedure on this directory on a regular basis. You can accomplish this via a script that runs through
your system scheduler; it should be safe to delete any content files in this directory that are more than a week old.
Memory Optimization for the Geo Service Plugin
The Pentaho Geo Service enables Geo Map visualizations in Analyzer.
If you do not use Analyzer
or are sure that you are not using the Geo Service, you can free up approximately 600MB
of RAM by removing the Geo Service plugin. Simply shut down the BA Server and delete the
/pentaho/server/
biserver-ee/pentaho-solutions/system/pentaho-geo/
directory.
If you are a heavy user of the Geo Service
, update the cache setting for
pentaho-geo-municipality
in the
ehcache.xml
. This file can be found in the
/pentaho/server/biserver-ee/tomcat/webapps/pentaho/WEB-
INF/classes
directory.
<cache
name="pentaho-geo-municipality"
maxElementsInMemory="125000"
eternal="false"
overflowToDisk="true"
timeToIdleSeconds="0"
timeToLiveSeconds="0"
diskPersistent="false"
diskExpiryThreadIntervalSeconds="120"
/>
The default setting,
maxElementsInMemory="125000"
, is a relatively low number and might need to be increased
if you are using the Geo Service. Pentaho suggests a setting between
275000
and
700000
for a heavy usage. When
|
Pentaho BA Server Performance Tips
|
7
you increase the
maxElementsInMemory
setting, less memory is available for other resources. To accomodate higher
maxElementsInMemory
settings, increase the maximum memory allocated to the JVM running Pentaho processes.
The default setting is 768m that there are no memory leaks or zombie sessions inherent in the BI Platform.
Please Refer below PDF for more Detail
https://drive.google.com/file/d/0B_j1hJxesvxdbDdEZWhkbTZmQW8/edit?usp=sharing

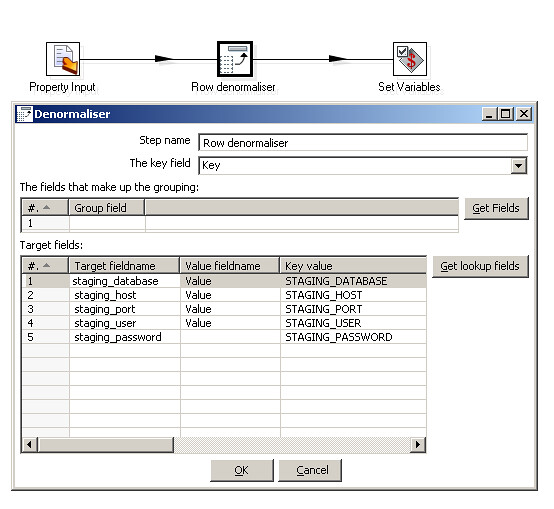 As
you can see in the screenshot, "Key" is the key field: the value of
this field is scanned to determine in which output fields to put the
corresponding value. There are no fields that make up a grouping:
rather, we want all key/value pairs to end up in one big row. Or put
another way, there is just one group comprising all key/value pairs.
Finally, the grid below specifies for each distinct value of the "Key"
field to which output field name it should be mapped, and in all cases,
we want the value of the "Value" field to be stored in those fields.
As
you can see in the screenshot, "Key" is the key field: the value of
this field is scanned to determine in which output fields to put the
corresponding value. There are no fields that make up a grouping:
rather, we want all key/value pairs to end up in one big row. Or put
another way, there is just one group comprising all key/value pairs.
Finally, the grid below specifies for each distinct value of the "Key"
field to which output field name it should be mapped, and in all cases,
we want the value of the "Value" field to be stored in those fields. 