Tuesday, 8 April 2025


File Search and Contact Extractor

Introduction:

The Keyword and Contact Extractor is a simple-to-use application that helps you find specific words, email addresses, and phone numbers within documents on your computer. It can look through Microsoft Word files (.docx), PDF documents (.pdf), and Java code files (.java). After it's done searching, it will show you the results on the screen and can also save them in a file for you.

This guide will show you how to install and use the Keyword and Contact Extractor.

System Requirements:

  • Operating System: Windows
  • You don't need to install anything extra! This application is ready to run.

Installation:

  1. Locate the application file: Find the app.exe file that you received. This is the program you need to run.
  2. Run the application: Double-click on the app.exe file. The application will start.

License Activation:

The first thing you'll see is a License Manager window. This helps make sure your copy of the application is valid.

  1. Choose how to enter your license:

    • Enter Key Manually: Click this button if you want to type your license key directly into the application.
    • Select Key File: Click this button if you have your license key saved in a file on your computer.
  2. Enter your license key:

    • Typing it in: If you chose "Enter Key Manually," a box will appear. Type your license key into this box and then click "Validate Key".
    • Choosing a file: If you chose "Select Key File," a window will pop up where you can look for your license key file (it might end in .lic.key, or .txt). Select the file and click "Open". Then, click "Validate File".
  3. Check if your license is active:

    • Success! If your license is good, you'll see a green message saying "License Valid!". The main part of the application will then open.
    • Oops! If your license isn't valid, you'll see a red message like "Invalid License Key." or "Invalid License Key in File.". The application will close after showing you this message. If this happens, please check your license key or file.

How to Use the Keyword and Contact Extractor:

Once the application is open, you can start searching for information in your documents.

  1. Pick a folder:

    • Click the "Browse" button next to "Select Folder:".
    • A window will appear where you can find and choose the folder on your computer that contains the documents you want to search through.
    • Once you've selected a folder, its name will show up in the box.
  2. Tell the application what to look for:

    • In the big text box labeled "Enter Keywords (comma-separated):", type the words you are searching for.
    • If you have more than one word, separate them with a comma (,). For example: important, meeting, project.
    • The search doesn't care if the letters are uppercase or lowercase (e.g., "Project" and "project" will both be found).
  3. Start the search:

    • Click the "Start Processing" button.
    • The application will now go through all the .docx.pdf, and .java files in the folder you selected. It will look for the keywords, email addresses, and phone numbers in those files.
    • As it searches, the "Processing Output:" area will show you what it's finding in each file.
  4. See the results:

    • The "Processing Output:" box will keep updating as the application works. For each file, you'll see:
      • The name of the file.
      • How many of your keywords were found in total.
      • Any email addresses that were found.
      • Any phone numbers that were found.
      • A count for each specific keyword you were looking for in that file.
  5. When it's finished:

    • Once the application has searched all the files, it will say "Processing complete!".
    • If it found any information, it will also tell you that it has saved the results in a file called keyword_counts_output.csv. This file will be in the same folder you selected to search. You can open this file with a program like Microsoft Excel to see a detailed breakdown of the results.
    • If there were no supported files in the folder you chose, it will say "No supported files found in this folder.".

Support & Information:

In the License Manager window (the first window you see), you'll find some helpful information at the bottom:

  • Version: This shows you which version of the application you are using (e.g., Version: 1.0.0).
  • Support Contact: You'll find an email address listed here (e.g., For support, please contact: support@example.com). If you have any problems or questions, you can send an email to this address.

Troubleshooting:

  • The application doesn't open: Make sure you double-clicked the app.exe file. If it still doesn't open, try restarting your computer.
  • It says I need to install something: If you see a message about missing files when you run app.exe, please contact the person who gave you the application. It should be ready to run without needing extra installations.
  • No files are being searched: Check if the folder you selected actually has .docx.pdf, or .java files in it.
  • The search results aren't what I expected: Make sure you typed the keywords correctly in the "Enter Keywords" box and that they are separated by commas.
  • License problems: If you keep getting errors about your license, double-check the license key you entered or the license file you selected. If you're still having trouble, use the support email address provided in the License Manager.


Important Note:

This application does its best to find the information you're looking for, but it's a computer program and might not always be perfect. Always double-check important results yourself.

Thank you for using the Keyword and Contact Extractor!

download exe

 https://drive.google.com/file/d/125nEjwfhCK3IJqjPAbWk_K-bPDbo1H_2/view?usp=sharing 

Sunday, 21 July 2024

Azure, GCP and AWS Comparison wrt to Cloud Database Migration.

Features AWS (Amazon Web Services) GCP (Google Cloud Platform) Azure Pentaho
Sources Supported Oracle, SQL Server, MySQL, MariaDB, PostgreSQL, MongoDB, and more.
 MySQL, PostgreSQL, SQL Server. SQL Server, MySQL, PostgreSQL, Oracle, MongoDB.
Supports all most  most all Databases 
AWS Database Migration Service  AWS Database Migration Service (DMS):

Targets Supported: Amazon RDS (all engines), Aurora, Redshift, DynamoDB, S3.
Features: Continuous data replication, minimal downtime, schema conversion, data validation.
Database Migration Service (DMS):


Targets Supported: Cloud SQL (MySQL, PostgreSQL, SQL Server).
Features: Minimal downtime, automated provisioning of Cloud SQL instances, schema and data migration.
Azure Database Migration Service (DMS):

Targets Supported: Azure SQL Database, Azure SQL Managed Instance, Azure Database for MySQL, Azure Database for PostgreSQL, Cosmos DB.
Features: Automated assessment, continuous replication, downtime minimization.
Pentaho PDI Can be custamized 
 AWS Schema Conversion Tool   AWS Schema Conversion Tool (SCT)
Purpose: Converts database schema from one database engine to another.
Database Migration Workbench (Beta):

A graphical user interface (GUI) tool that helps in assessing, planning, and executing database migrations.
Provides schema assessment and conversion functionalities.
Azure Migrate:

Purpose: Central hub for tracking, assessing, and migrating on-premises databases, VMs, and applications to Azure.
NA
Pentaho PDI Can be custamized  for spacific source and target database engine
 Physical data transport solution AWS Snowball:

Purpose: Physical data transport solution for transferring large amounts of data.
Usage: Useful for petabyte-scale data migrations where network transfer is impractical
Transfer Appliance:

Purpose: Physical data transfer solution.
Usage: For large-scale data transfers where network-based transfer is not feasible.

Azure Data Box:

Purpose: Physical data transfer solution.
Usage: For transferring large amounts of data to Azure where network transfer is impractical.
Pentaho PDI Can be custamized , for bulkload 
Moving large amounts  AWS DataSync:

Purpose: Automates moving large amounts of data between on-premises storage and AWS.
Usage: For continuous or one-time data migrations, including file transfers.
BigQuery Data Transfer Service:

Purpose: Moves data into BigQuery.
Usage: Supports data transfer from SaaS applications, Google services, and other sources into BigQuery.

Cloud Data Transfer Service:

Purpose: Transfers data to Google Cloud Storage.
Usage: Includes online transfer, transfer appliance, and storage transfer service for large datasets.
Azure Storage Migration Service:

Purpose: Transfers data to Azure Storage.
Usage: Supports moving data from on-premises storage systems to Azure Blob Storage, File Storage, and more.
Pentaho PDI Can be custamized for Bkp and restore with any ftp client

Saturday, 8 July 2023

which cloud is best option for creating data lake

 Both Google Cloud Platform (GCP) and Amazon Web Services (AWS) offer robust services for creating data lakes. The choice between the two depends on various factors, including your specific requirements, existing infrastructure, expertise, and budget. Here are some considerations for each cloud provider:


Google Cloud Platform (GCP) for Data Lakes:

- BigQuery: GCP's BigQuery is a fully managed, serverless data warehouse and analytics platform that can be used as a foundation for a data lake. It offers scalable storage and querying capabilities, along with integration with other GCP services.

- Cloud Storage: GCP's Cloud Storage provides a highly scalable and durable object storage solution. It can be used as a landing zone for ingesting and storing raw data before transforming it into a structured format for analysis.

- Dataflow: GCP's Dataflow is a managed data processing service that enables real-time and batch data processing pipelines. It can be used for data transformation, cleansing, and enrichment tasks within a data lake architecture.

- Dataproc: GCP's Dataproc is a managed Apache Hadoop and Apache Spark service. It provides a scalable environment for running big data processing and analytics workloads on GCP.


Amazon Web Services (AWS) for Data Lakes:

- Amazon S3: AWS's Simple Storage Service (S3) is a highly scalable object storage service that can be used as the foundation for a data lake. It provides durability, availability, and security for storing large volumes of data.

- Amazon Glue: AWS's Glue is a fully managed extract, transform, and load (ETL) service. It can automate the process of cataloging, cleaning, and transforming data to make it ready for analysis within a data lake.

- Amazon Athena: AWS's Athena is an interactive query service that allows you to analyze data directly in Amazon S3 using SQL queries. It provides an on-demand, serverless approach to querying data within a data lake without the need for infrastructure provisioning.

- AWS Lake Formation: AWS Lake Formation is a service that simplifies the process of setting up and managing a data lake. It provides features for data ingestion, metadata management, and access control.


Both GCP and AWS have strong offerings for building data lakes, and the choice depends on your specific needs and preferences. It is recommended to evaluate the features, pricing, scalability, security, and ecosystem of each provider to determine which one aligns best with your requirements and organizational goals.

Storage types in GCP vs AWS and Azure cloud

 Here's a comparison of storage types available in Google Cloud Platform (GCP), Amazon Web Services (AWS), and Microsoft Azure:


1. Object Storage:

   - GCP: Cloud Storage

   - AWS: Amazon S3 (Simple Storage Service)

   - Azure: Azure Blob Storage


2. Block Storage:

   - GCP: Persistent Disk

   - AWS: Amazon Elastic Block Store (EBS)

   - Azure: Azure Managed Disks


3. File Storage:

   - GCP: Cloud Filestore

   - AWS: Amazon Elastic File System (EFS)

   - Azure: Azure Files


4. In-Memory Data Store:

   - GCP: Cloud Memorystore (supports Redis and Memcached)

   - AWS: Amazon ElastiCache (supports Redis and Memcached)

   - Azure: Azure Cache for Redis


5. NoSQL Database:

   - GCP: Cloud Firestore, Cloud Bigtable

   - AWS: Amazon DynamoDB

   - Azure: Azure Cosmos DB


6. Relational Database:

   - GCP: Cloud Spanner

   - AWS: Amazon RDS (Relational Database Service)

   - Azure: Azure SQL Database


7. Data Warehousing:

   - GCP: BigQuery

   - AWS: Amazon Redshift

   - Azure: Azure Synapse Analytics (formerly SQL Data Warehouse)


8. Archive Storage:

   - GCP: Cloud Storage Coldline, Archive

   - AWS: Amazon S3 Glacier

   - Azure: Azure Archive Storage


It's important to note that while there are similarities in the storage types provided by GCP, AWS, and Azure, there may be differences in terms of specific features, performance characteristics, pricing models, and regional availability. It's advisable to consult the respective cloud providers' documentation for detailed information on each storage service and evaluate which one best fits your specific requirements.

How Aws can used for data ware housing with pentaho

AWS (Amazon Web Services) offers several services that can be used for data warehousing. Here are some key AWS services commonly used in data warehousing:


1. Amazon Redshift: Redshift is a fully managed data warehousing service that allows you to analyze large volumes of data. It provides a petabyte-scale data warehouse that can handle high-performance analytics workloads. Redshift integrates with various data sources, including Amazon S3, Amazon DynamoDB, and other AWS services. It offers features like columnar storage, parallel query execution, and data compression for efficient data storage and retrieval.


2. Amazon S3 (Simple Storage Service): S3 is an object storage service that can be used as a data lake for storing raw data. It provides scalable storage for structured and unstructured data. You can store data in S3 and then load it into Redshift or other data warehousing systems for analysis. S3 integrates with various AWS services and provides high durability, availability, and security.

Pentaho Can be used as ETL and data loading tool instead of glue/

3. AWS Glue: Glue is a fully managed extract, transform, and load (ETL) service. It allows you to prepare and transform your data for analytics. Glue provides a serverless environment to run ETL jobs, and it automatically generates code to infer schema and transform data. You can use Glue to prepare data for loading into Redshift or other data warehousing solutions.


4. AWS Data Pipeline: Data Pipeline is a web service for orchestrating and automating the movement and transformation of data between different AWS services. It helps you create data-driven workflows and manage dependencies between various steps in your data processing pipeline. Data Pipeline can be used to schedule and automate data movement and transformation tasks for data warehousing.


5. Amazon Athena: Athena is an interactive query service that allows you to analyze data directly from S3 using standard SQL queries. It enables you to perform ad-hoc queries on your data without the need for data loading or pre-defined schemas. Athena is useful for exploratory data analysis and can be integrated with data warehousing solutions for specific use cases.


6. AWS Glue Data Catalog: Glue Data Catalog is a fully managed metadata repository that integrates with various AWS services. It acts as a central catalog for storing and managing metadata about your data assets, including tables, schemas, and partitions. The Glue Data Catalog can be used to discover and explore data stored in S3 or other data sources, making it easier to manage and query data in your data warehouse.


These are just a few examples of how AWS can be used for data warehousing. Depending on your specific requirements and use case, there may be additional AWS services and tools that can be utilized in your data warehousing architecture.

Wednesday, 17 August 2022

 Pentaho Email Alerting system


Pentaho can used to create  an Alerting  tool using that any kind of report can be triggered using email.

Some use case example,

  1. Suppose I want todays sales report to get this report just send email to given email id with specific subject like  “send me todays sales report” After some time (2-3 min) an email with sales report graphical and tabular  as attachment (pdf ,csv, excel ..)will be send to the user.
  2. Data base Artifact report form almost any database can be generated and send on demand to the user .
  • It can configured to send some alert also
    • if database/table  space is less then 10 %
    • if any specific query is taking longer than expected to execute.
    • Top 10 query by performance.
    • Top 10 table by space used.
  • It can configured to load data from any excel sheet(from email attachment) to any database in predefined tables.
  •  It configure to execute any batch of shell command directly from email.
  • Major advantage of this tool is to get reports/Alerts without logging into any system, everything can be triggered using email from specific id.
  • These reports/Alerts can be scheduled to run on any specific time also,


Friday, 9 October 2020

How to Load data into Anaplan And Amazon S3 using Pentaho

How to Load data into Anaplan And Amazon S3 using Pentaho

 Beow expample :-

1.Read Data from data source.

2.Get AWS S3 File loacation

3.Load to Anaplan using web services (rest API call)

4.Capture records which are Failed while  loading to anaplan.

5.Retrive those failed records using Json query and load failed record to seperate csv file in Amazon S3

6.Stop the cthe process if there is no record to load.


https://drive.google.com/file/d/1pMiFN91r63y_jMp4tDnYwpz1EJ_-BbhA/view?usp=sharing


Wednesday, 14 August 2019

How to load \ retrieve data to neo4j using Pentaho

Neo4j and Pentaho (PDI)
This document explain how to connect neo4j with PDI and load and retrieve data from PDI, Load Data from CSV to neo4j
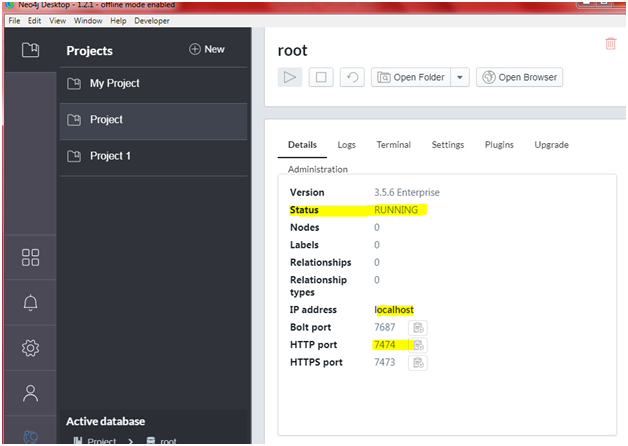
Neo4j prerequisite
aNeo4j should be up and running
      All required credentials including username and password should be available
c  Example below screenshot.
   Download working copy of above example from here and 2ndFile
   Load data to neo4j from csv download working copy from here and example  csv file from here


How to Connect Neo4j from PDI
1. Get JDBC driver
d)     Get the jdbc driver from below location.This driver is pre complied and ready to use.this driver hasbeen tested with pentaho pdi 8.2 and Neo4j desktop 3.5.6.
e)     http://dist.neo4j.org/neo4j-jdbc/neo4j-jdbc-2.0.1-SNAPSHOT-jar-with-dependencies.jar
f)     Add above driver to add to the <pdi Istalation directoey>/data-integration\lib folder
g)    Restart Spoon
2. Create Connection though pentaho
1.Open spoon
2.open new transformation
3.Select Table input step
4.go for  creating new connection


5.Create New connection As per below
·         Connection type as Generic database
·         Custom connection URL as jdbc:neo4j://localhost:7474
·         Custom driver class name as org.neo4j.jdbc.Driver


6.Test connection:-


2. Load Data to Neo4j using Pentaho(PDI)
1.Select Execute SQL script
2.Put SQL script into the  " Execute SQL script "  step. Refer below pic attached.


Run the transformation:
After successful run this will load one record "SHANKAR" to Neo4j


2. Retrieve Data from Neo4j using Pentaho(PDI)
1.Select Table input step  
2.Put SQL script into the  " Table input "  step. Refer below pic attached.


Run the transformation:
After successful run one record will be retrived from Neo4j,
below is log snip shot
2019/08/14 14:01:20 - Write to logs.0 - ------------> Linenr 1------------------------------
2019/08/14 14:01:20 - Write to logs.0 - ====Data retrived from neo4j========
2019/08/14 14:01:20 - Write to logs.0 -
2019/08/14 14:01:20 - Write to logs.0 - Shankar = {"born":1982,"name":"Shankar"}


Load Data from CSV file to neo4j

Load your Csv file to neo4j installation directory or you can put ditrctly http,https,FTP location as well.


<Instalation directory >\.Neo4jDesktop\neo4jDatabases\database-39ba8418-e334-4730-b8b2-1434f4d6db48\installation-3.5.6\import\desktop-csv-import\<csv file name>


Download working copy of above example from here and 2ndFile
https://drive.google.com/file/d/1FgJRNbRogl4OhmPPHLBQVFtecyoqE88R/view?usp=sharing
https://drive.google.com/file/d/15Y1ySRDYpzYu3L-vzxFX5xKyjsEKowia/view?usp=sharing

Load data to neo4j from csv download working copy from here and expale csv file from here
https://drive.google.com/file/d/19C-91CvUW3bv9UanSBbfID9kmFOVTBDv/view?usp=sharing
https://drive.google.com/file/d/1500NY0LKUovBexM3dS7P4wmwJtq_XjLF/view?usp=sharing

Some useful Cypher commands:-

1.Load Data from CSV file to neo4j without headers.

LOAD CSV FROM 'file:///desktop-csv-import/NeotestCSV2.csv' AS line

 CREATE (:Artist2 { Test: line[1], Name: (line[2])})

.Load Data from CSV file to neo4j with headers.

LOAD CSV FROM 'file:///desktop-csv-import/NeotestCSV2.csv' AS line
 CREATE (:Artist2 { Test: line[1], Name: (line[2])})

1.check count of loaded record
 MATCH (p:Artist)
 RETURN count(p)

2.Select record from Lable (Table in neo4j)
MATCH (p:Artist)
 RETURN p

3. Get the queryId by useing below command
 CALL dbms.listQueries()

4.Kill Running query in neo4j
example:-
CALL dbms.killQuery('query-685')

Sunday, 29 April 2018

How to use Kafka consumer in pentaho 8


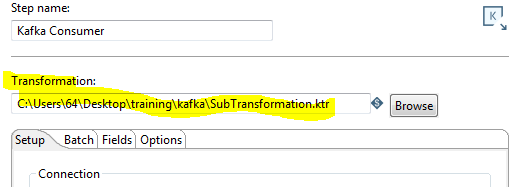
1.Create  main and sub transformation as discussed below
2.call sub transformation from main Transformation

Note:-Sub transformation required for Kafka consumer step


Download working sample from here
https://drive.google.com/open?id=1Z4C2miczU0BnB4n3r1LcpN78v2UjefWQ


In the kaka transformation,

1.We are using direct bootstrap server on connection. 
2. we added the consumer group "test-consumer-group1" change consumer group after every run to retrieve Kafka message from start.
Important:-if you not change consumer group, kafka will not retrieve any message unless any new message arrived to topic.
like test-consumer-group1,test-consumer-group2,test-consumer-group3 .....
3. Changed the auto.offset.reset to "earliest" on options tab.

In the sub transformation.

In "Get records from stream" step, we gave the below fields Fieldname Type key None
message None
topic None
partition None
offset None
timestamp Timestamp

Kafka Version: kafka_2.11-1.1.0

I uploaded a sample .ktr that works


References:-https://help.pentaho.com/Documentation/8.0/Products/Data_Integration/Transformation_Step_Reference/Kafka_Consumer

Saturday, 28 April 2018

Load data to Kafka from pentaho


Set Up Kafka and use from pentaho


In this tutorial, I will show how to set up and run Apache Kafka on Windows/linux and how to load/read data from pentaho. 
Kafka comes with two sets of scripts to run Kafka. In the bin folder, the sh files are used to set up Kafka in a Linux environment. In the bin\windows folder, there are also some bat files corresponds to those sh files which are supposed to work in a Windows environment.  Some say you can use Cygwin to execute the sh scripts in order to run Kafka. However, they are many additional steps involved, and in the end you may not get the desired outcome. With the correct bat files, there is no need to use Cygwin, and only Server JRE is required to run Kafka on Windows.

Step 0: Preparation

Install Java 8 SE Server JRE/JDK

You need Java SE Server JRE in order to run Kafka. If you have JDK installed, you already have Server JRE installed, just check if the folder {JRE_PATH}\bin\server exists. If it is not, follow the following steps to install Java SE Server JRE:
  1. Unpack it to a folder, for example C:\Java.
  2. Update the system environment variable PATH to include C:\Java\jre\bin, follow this guide provided by Java.

Download Kafka

  1. Download the binaries from http://kafka.apache.org/downloads.html
  2. Unpack it to a folder, for example C:\kafka

Step 1: Update files and configurations

Update Kafka configuration files

The config files need to be updated corresponding to Windows path naming convention.
Change this path if you using Windows
*** Important :- create this path inside Kafka root directory,other wise Kafka server may not start
  1. Open config\server.properties, change


server.properties
1
log.dirs=/tmp/kafka-logs

to


server.properties
1
log.dirs=c:/kafka/kafka-logs

2.. Open config\zookeeper.properties, change


zookeeper.proerties
1
dataDir=/tmp/zookeeper

to


zookeeper.properties
1
dataDir=c:/kafka/zookeeper-data

Step 2: Start the Server

In Windows Command Prompt, switch the current working directory to C:\kafka:


1
cd C:\kafka

  1. Start Zookeeper
  2. you can create bat file to start Zooker (optional)  kafka-server-start.bat and put below conteent      kafka-server-start.bat {base folder}\kafkaBinary\kafka_2.11-1.1.0\config\server.properties
Kafka uses ZooKeeper so you need to first start a ZooKeeper server if you don’t already have one. You can use the convenience script packaged with Kafka to get a quick-and-dirty single-node ZooKeeper instance.


  1. you can create bat file to start Kafka (optional)    kafka-server-start.bat and put below conteent      zookeeper-server-start.bat {base folder}\kafka_2.11-1.1.0\config\zookeeper.properties


1
> .\bin\windows\kafka-server-start.bat .\config\server.properties

Step 3: Create a topic

  1. Create a topic
Let’s create a topic named “test” with a single partition and only one replica:


1
> .\bin\windows\kafka-topics.bat --create --zookeeper localhost:2181 --replication-factor 1 --partitions 1 --topic test

2.. List topics
We can now see that topic if we run the list topic command:


1
> .\bin\windows\kafka-topics.bat --list --zookeeper localhost:2181

Step 4: Send some messages

Kafka comes with a command line client that will take input from a file or from standard input and send it out as messages to the Kafka cluster. By default each line will be sent as a separate message.
  1. Start console producer


1
> .\bin\windows\kafka-console-producer.bat --broker-list localhost:9092 --topic test

2.. Write some messages


1
2
This is a message
This is another message

Step 5: Start a consumer


1
> .\bin\windows\kafka-console-consumer.bat --zookeeper localhost:2181 --topic test --from-beginning

If you have each of the above commands running in a different terminal then you should now be able to type messages into the producer terminal and see them appear in the consumer terminal.
Yay cheers!

Common Errors and Solutions

classpath is empty. please build the project first e.g. by running 'gradlew jarall'

  • Note: Do not download a source files from appache kafka, download a binary file

Kafka java.io.EOFException - NetworkReceive.readFromReadableChannel

Zookeeper may not configured propery (may be configured with different port number)

References
https://kafka.apache.org/

Kafka tool installation:

This is GUI interface of kafka where you can view messages,check count of messages and create and delete Kafka topic
Down load kafka tool from 
http://www.kafkatool.com/
Now install executable file in your system
This is very useful tool to view data in kafka


Load data to Kafka Topic using pentaho 8.0:

step 0:-if you are not using pentaho 8 you may require to download kafka producer and consumer from pentaho wiki
https://wiki.pentaho.com/display/EAI/Apache+Kafka+Producer
https://wiki.pentaho.com/display/EAI/Apache+Kafka+Consumer

1.start spoon.bat
2.open spoon canvas
3.Read  data from file/database or data grid
4.convert data to valid Json object 
5.Load data to kafka topic (may be conversion to valid json object is required)

Download below example from here
https://drive.google.com/file/d/1Ik0RGTSTKphPrGN4M7rwDLhFDpsDbAsd/view?usp=sharing


while using  pentaho consumer you can use same configration as shown in above example

Important:-you need to change GROUP ID every time if you want to read data from start. 


Some useful Json quary Tips. 


Exapmle


---------------
{ "store": {
    "book": [ 
      { "category": "reference",
        "author": "Nigel Rees",
        "title": "Sayings of the Century",
        "price": 8.95
      },
      { "category": "fiction",
        "author": "Evelyn Waugh",
        "title": "Sword of Honour",
        "price": 12.99
      },
      { "category": "fiction",
        "author": "Herman Melville",
        "title": "Moby Dick",
        "isbn": "0-553-21311-3",
        "price": 8.99
      },
      { "category": "fiction",
        "author": "J. R. R. Tolkien",
        "title": "The Lord of the Rings",
        "isbn": "0-395-19395-8",
        "price": 22.99
      }
    ],
    "bicycle": {
      "color": "red",
      "price": 19.95
    }
  }
}

Json Query Result 


XPathJSONPathResult
/store/book/author$.store.book[*].authorthe authors of all books in the store
//author$..authorall authors
/store/*$.store.*all things in store, which are some books and a red bicycle.
/store//price$.store..pricethe price of everything in the store.
//book[3]$..book[2]the third book
//book[last()]$..book[(@.length-1)]
$..book[-1:]
the last book in order.
//book[position()<3]$..book[0,1]
$..book[:2]
the first two books
//book[isbn]$..book[?(@.isbn)]filter all books with isbn number
//book[price<10]$..book[?(@.price<10)]filter all books cheapier than 10
//*$..*all Elements in XML document. All members of JSON structure.

References 
http://www.jsonquerytool.com/
http://goessner.net/articles/JsonPath/